Creating an installation package for your program is an important step in distributing software. Visual Studio 2022 provides a powerful tool to create a professional installer file to make an easy installation process for clients. This tutorial guides you on how to create a complete installation file in Visual Studio 2022 and also gives you information about license options.
Understanding installation project in Visual Studio 2022
Before starting technical steps, it’s important to know what an installation project does exactly. An installation project, which is often named installer, packages your program with all its dependencies, input registry and configuration files in a unique file. Clients can run this file to install your software on their system.
Visual Studio 2022 by default has no installation capability for projects. Microsoft transferred this capability to a plugin named “Microsoft Visual Studio Installer Projects”. Putting this feature in a plugin helps modularity options of Visual Studio and, in this way, developers only install whatever they need.
Prerequisites
Before creating an installer file for every project, some prerequisites should be ready so that we review them:
- Installed version of Visual Studio 2022 (community, professional or enterprise)
- A project application that you want to create an installer for.
- Microsoft Visual Studio Installer Projects plugin.
Installing Visual Studio installer project plugin
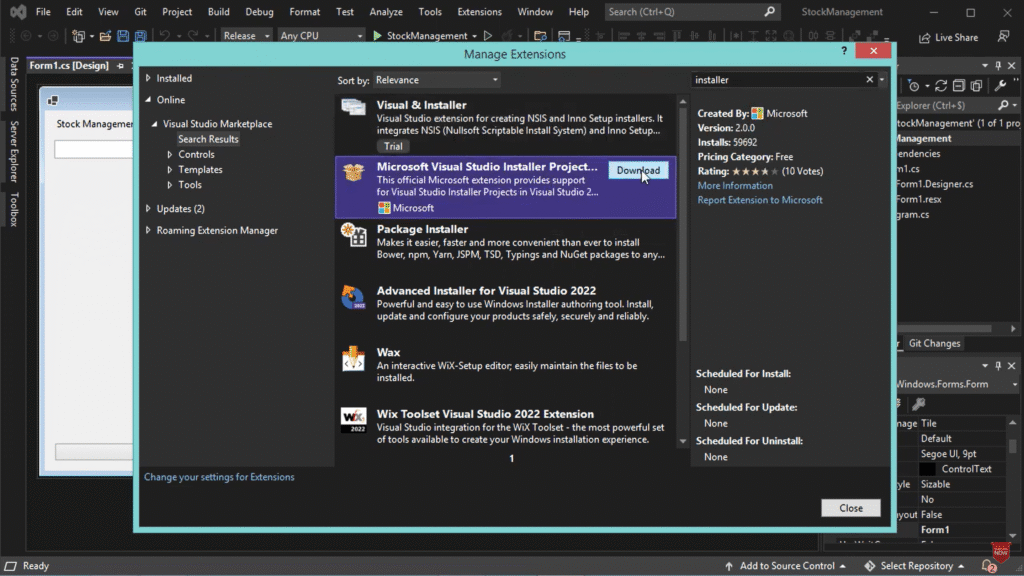
To install the plugin, first you have to open Visual Studio 2022, then click on “Extensions” on the top menu. Then you must select “Manage Extensions” and type the “Microsoft Visual Studio Installer Project” expression in the search box.
Click on “Download” next to the plugin and close Visual Studio to complete installation. VSIX installer will run automatically. Next follow the instructions to install the plugin. At the end, restart Visual Studio 2022.
Step-by-step process of creating project installer
When you are reading this part, it means you have installed the required plugin, and now you want to create a project installer.
Step 1: adding a new installer project
Open your solution in Visual Studio 2022 and right click on it in Solution Explorer. Select “Add” > “New Project” then search for the “setup” expression in “Add a new project”. Next you have to select the “Setup Project” from results. In this phase, name your project installer (for example, “MyAppSetup”) and click on “Create”.
Step 2: configuring program files
Right click on newly installed project in solution explorer. Next, select “Add” > “Project Output”. Select your main project in the drop-down menu. Next select “Project Output Group”, “Primary Output” from the drop-down menu and, at the end, click on “Ok”.
This works, adds a compiled running file of your program to the installer. You can also add the following to your file.
- Content files: documents, images or other sources.
- Localized sources: for multi-language programs.
- Debug symbols: they are helpful for debugging established programs.
Step 3: adding additional files
If your program needs configuration files, databases or other sources, then right-click on your install project. Select “Add” > “File”. Go to the required files and select them. Next, click on “Open”.
Step 4: configuring program shortcuts
To create shortcuts on the start menu or desktop, right click on the project installer and select “View” > “File System”, then right click on “Application Folder” in the File system editor and select “Create New Shortcut”. In this phase you should select your main program output and name your shortcut. At the end, drag the created shortcut to “User’s Programs Menu” or “User’s Desktop”.
Step 5: configuring prerequisites
Your program may need special components such as the .NET Framework. To make them ready, right-click on the installer project and select “properties”. Then click on “Prerequisites” and select items that your program needs. Select these prerequisites that will be downloaded from the web or be included in the installation, then click “OK”.
Step 6: set project properties
In this step, it’s time to configure important details of the installer. You should right-click on the installation project and select “Properties”. Now set features such as the item below and then click on “Apply”.
- Writer
- Description
- Creator
- Product name
- Version number
- Support contact information
Step 7: build and install project
Now it’s time to build your own installer. Nothing more than right-clicking on the installation project and selecting “Build” is required. Visual Studio 2022 will create an MSI file in output directory which is often in bin\Debug or in bin\Release.
Advanced configuration options
Customizing operation
Customizing operations lets you run code through the installation process. To do so, first right click on install project, then select “View” > “Custom Actions”. Next, right-click on the desired installation step (Rollback, Commit, Install or Uninstall). You should select “Add Custom Action” as the fourth step and select a set that contains your customized operation, then click on “OK”.
Registry inputs
If your program needs a registry setting, then right click on install project, select “View” > “Registry” and go to a suitable registry location. Next, right click and select “New Key” or “New String Value”. It’s time to set the required registry value.
File type dependencies
You may need to relate your program with special types of files. Right click on install project and select “View” > “File Types”, then right click and select “Add File Type”. In this phase you should configure file postfix, description and operation. Then link the operation to the program running file.
Visual Studio 2022 license options
While you are working on your projects, you may think which Visual Studio 2022 version has more compliance with your needs. The enterprise version offers a comprehensive set of tools and features for professional development teams.
For people who are looking for a license key for the Visual Studio 2022 enterprise, finding valid channels to gain this software is very important. Microsoft provides different license options to organizations, such as subscribing through the Visual Studio website or a volume license.
Visual Studio 2022 download
You can download Visual Studio 2022 directly from the official website of Microsoft. Although there are some sources for those who need an offline installer for establishment in environments with limited internet connection.
One of these sources is DownloadDevTools.com, which provides an offline installer of Visual Studio 2022 for different versions. This site offers installer packages that can be beneficial for developers who need to install Visual Studio on multiple devices or are in environments with limited access to the internet.
Always remember to confirm download source and make sure you are consistent with your Microsoft license.
Testing your installer
Before distributing your installer file, test it to see if it works without problem. To do so, test the installer on a clean system and confirm that all features are working properly after installation. Also check the uninstall process. In both phases, check error messages or unexpected behavior.
Solving common problems
There may be some common errors and problems that we cover in this section.
One of the problems is failure of installation with error code. If users report an installation failure, check if all prerequisites are installed correctly. Also, confirm that the Windows installer is running and make sure users have the required licenses.
The other problem is lost components after installation. If some of the components don’t work, confirm that all required files and all dependencies are included in the installation project. Then check file paths.
There may sometimes be when program corrupts after installation. In this situation, check incompatibility (x86 vs x64). Next, confirm that all Dlls are included correctly; then test environmental differences between developing machines and users.
Conclusion
Creating an installation file in Visual Studio 2022 is a professional method to distribute your programs. By following this comprehensive guide, you can create an installer that manages all aspects of the installation process, from establishment to setting registries and shortcuts.
Remember that using tools like the Visual Studio Installer Project plugin makes this process easy, but you must test the installer after creation and before distribution in order to make sure that users experience easy use of this installer.
With a suitable installation file, you can make sure that your programs are installed in the correct way and as expected, on user systems. Remember user technical expertise is not important in creating process.


This post is of great quality!