
Starting to work with Visual Studio is exciting, especially after a fresh installation. If you want to code faster and with more confidence, leveraging the powerful built-in shortcuts and features of this IDE is incredibly helpful. This article reviews 7 simple tips, from smart code completion to integrated Git tools, that can save you time and keystrokes every day. These tips are for beginner or intermediate programmers and include simple examples and tutorials.
1. Use IntelliCode for Smart Code Completion
IntelliCode in Visual Studio is a smart IntelliSense feature that provides precise suggestions with the help of AI. While you write code, IntelliCode analyzes variable names, functions, and the current context, previewing the most commonly used options at the top of the suggestion list. It may even complete an entire line of code. To use it, start typing and look for the star icon in the suggestion box.
For example, if you begin to write a common method or pattern, IntelliCode may suggest a whole section of that code, allowing you to accept it with a single keypress. This feature runs locally and is active by default in Visual Studio 2022, so you can save time by accepting AI suggestions and reducing the need for lengthy code typing.
Example: When starting to type a loop or a common command, such as the full structure of a for loop, pressing the Tab key will prompt IntelliCode to suggest code completion.
If IntelliCode isn’t active for you, go to Tools > Options > IntelliCode and ensure the “AI completions” option is active.
IntelliCode also enhances IntelliSense features by previewing the most common suggestions, based on analyzing popular open-source code, at the top of the list.
Using IntelliCode helps you write code faster and more uniformly, especially when you are learning APIs or new frameworks, because it previews the most useful suggestions relevant to your situation.
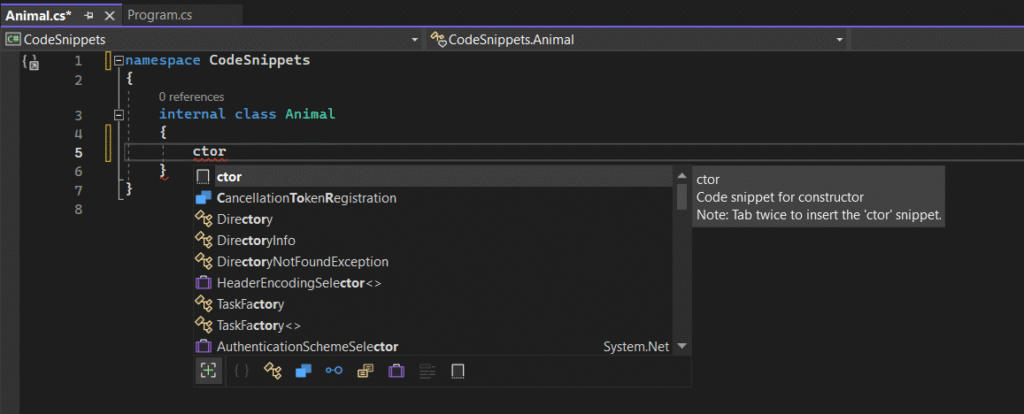
2. Inserting and Customizing Code Snippets
Code snippets are predefined patterns for common code blocks (such as loops, property definitions, try-catch blocks, etc.). Instead of manually writing these repetitive codes, you can insert a snippet and simply fill in its details. This saves time and reduces the probability of typographical errors. Visual Studio has many built-in snippets, and you can also create your own custom snippets.
Using Ready-to-Use Snippets: Simply type the snippet shortcut words and press the Tab key twice. For example, typing for + Tab + Tab inserts a complete for loop. Typing prop + Tab + Tab adds a property, and typing try + Tab + Tab inserts a try/catch block.
Manually Inserting Snippets: By pressing Ctrl + K, then Ctrl + X, you can open the “Insert Snippet” menu and choose your appropriate option from the list.
Creating Customized Snippets: To create your desired snippet, go to Tools > Code Snippet Manager. From there, you can import a special XML file or write one yourself. This method is practical when you repeatedly write a specific code structure.
Using snippets reduces the need for extensive code typing and also decreases the probability of errors. Snippets help you generate standard code structures faster, allowing you to focus your time on the core programming logic.
3. Use Hot Reload to See Changes Instantly
The Hot Reload feature allows you to see changes you’ve made in your applications instantly, without needing to stop the application or recompile from scratch. In Visual Studio, this feature is active for most .NET applications. This means you can edit and continue, remaining productive.
Run Program in Debug Mode: Run your program by pressing F5 (to run with debugger) or Ctrl + F5 (to run without debugger).
Change in Code: Open any file and make changes (for example, change a string or a button title in the interface).
Apply Changes with Hot Reload: Click on the Hot Reload button (the lightning icon in the toolbar) or press Alt + F10. Visual Studio will apply the changes to the running program. You can then instantly see the applied changes in the application (e.g., a button title will change or a new color will appear in the UI). This eliminates the need to close and re-run the program, saving a lot of time. Microsoft states that Hot Reload is designed to eliminate as much re-running during edits as possible. Overall, you can test changes and reformations instantly with Hot Reload.
4. Mastering Keyboard Shortcuts and the Search Bar
Keyboard shortcuts are essential in programming to accelerate speed. In Visual Studio, shortcuts are also previewed in the search bar to simplify their learning. The combined use of the search bar and relevant shortcuts transforms your work experience:
Search Bar (Ctrl + Q): By pressing Ctrl + Q and typing a keyword such as “open file” or “options,” the search panel will open and related commands with their shortcuts will be previewed. This is a wonderful way to discover and learn new shortcuts. For example, if you type “todo,” the task list section will preview commands related to “TODO” in their expression.
Navigation Shortcuts: You can go directly to a function or class definition with F12. If you are using snippet insertion, the Ctrl + K, then Ctrl + X shortcut is very practical.
Editing Shortcuts: To comment a line or a section, use Ctrl + / or Ctrl + K then Ctrl + C. To uncomment, use Ctrl + K then Ctrl + U. In newer versions, you can also toggle comments with Ctrl + K then Ctrl + C.
Formatting Shortcuts: To format the entire document, press Ctrl + K then Ctrl + D, or for selected sections, use Ctrl + K then Ctrl + F. This will lead to better order and readability of your code.
General Shortcuts: Use Ctrl + N for a new file, Ctrl + O to open a file, Ctrl + S to save, and Alt + F4 to exit. In debug mode, F5 is practical for starting or stopping, F9 for breakpoints, and F10/F11 to run code step by step.
Learning even some of these shortcuts will have a significant positive effect on your speed and ease of work. Also, if you are used to Visual Studio Code or ReSharper, you can customize shortcut settings or upload ready patterns from Tools > Options > Environment > Keyboard.
5. Use Visual Studio’s Internal Git
Full Git support is embedded internally within the Visual Studio development environment. It’s not necessary to go to a separate tool for version control – you can perform all basic Git operations directly in Visual Studio. Through the Git menu and Git Changes tool window, you can easily work with your repository. For example:
Git Changes Window: You can see all pending changes, stage files, write commit messages, and perform commit or push operations without exiting the IDE.
Repository Operations: You see the current branch in the status bar. You can easily switch between branches or create a new branch. Visual Studio shows you if you have commits to pull or push. You can compare branches or commits and see line-by-line differences.
Merge Conflict: If you encounter a merge conflict, Visual Studio will provide a graphical guidance tool that highlights differences and lets you choose or edit.
Key Point: All these facilities, from code to version histories, are concentrated in one place. If you forget to push before pulling, the environment will guide you with messages to make the best decision.
To start, go to the Git menu or View > Git Changes. Visual Studio will guide you step-by-step on how to clone a repository or add a project to version control.

6. Installing Plugins from the Marketplace
Plugins can add more productivity tools to Visual Studio. There are thousands of plugins in the Visual Studio Marketplace designed to save time or add beneficial features. For example, you can install plugins to format code, support more languages, or apply visual themes.
Review and Install Plugins: Go to Extensions > Manage Extensions. You can search for your plugin there or review categories such as “Tools” or “Code Review.” Each plugin is displayed with its download count and user rating, allowing you to choose popular ones.
Examples of Popular Plugins:
- CodeMaid: To sort and clean code.
- Productivity Power Tools: A set of practical improvements for editors.
- GitHub Copilot: AI-powered programming assistant.
There are even plugins to change icons or edit special files to make your working environment more pleasant. If you or your team create dedicated tools, you can also publish your plugins in the Marketplace. For now, installing some popular plugins is an excellent start.
Plugins genuinely improve your working experience. These plugins are integrated with the Visual Studio environment – after installing, new options are often added to menus. Selecting some practical plugins for daily tasks can save you valuable minutes.
7. Use of Watch Debug Tools, Breakpoints, and Call Stack
Debugging is a glorious part of Visual Studio. Effective use of debug tools can remarkably decrease problem-solving time. Here we introduce some key capabilities:
Setting Breakpoint: Click on the left margin next to the code line or press F9 to activate or deactivate a breakpoint. A red dot will appear. When running with F5, code execution will stop on that line, allowing you to check the program’s status at that moment.
Start Debugging: By clicking F5 or the green ▶ button, the debugger will run and stop at the first breakpoint. Then you can follow the code line by line: step into a function with F11 (step into) or step over it with F10 (step over).
Watch and Check Variables: When the code is stopped, you can see a variable’s value by hovering your mouse over it. Or you can right-click on a variable and select “Add Watch” to follow its value dynamically. The “Locals” and “Autos” windows also automatically preview current variables.
Call Stack: By opening the “Call Stack” window (usually on the bottom or right side), you can see the chain of functions that led to the current point. This window will take you directly to that section of code.
Other Auxiliary Tools: If an exception occurs, Visual Studio’s exception helper will show you the error type and its message. You can watch variables from there or see the exact point of the error. Also, you can use the “Immediate Window” from Debug > Windows to review expressions faster or run your code dynamically.
These tools make debugging processes interactive and informative. For example, using a watch helps you follow variable changes moment by moment and not miss any detail. Also, checking the call stack will show you the exact path of code execution and help you understand how the program reached the current point.
Learning some key debugging shortcuts (such as F5 for debugging, F9 for setting breakpoints, F11 to step into a function, and Shift + F5 to stop debugging) gives you more control over program execution and saves more time in the bug-fixing process.
Conclusion
Visual Studio provides a rich collection of tools and features to code faster and smarter. With features such as IntelliCode, Code Snippets, Hot Reload, keyboard shortcuts, Git integration, plugins, and debug tools, you can make the working process smoother and, instead of searching in menus, dedicate your time to solving real problems.
We suggest you examine these tips – for example, every week, learn a new shortcut or use Hot Reload in your next project. These small changes have a big effect on your productivity. Getting more familiar with Visual Studio helps you gain more confidence in coding, and you will enjoy the development process.